Alternator
Swap Into 1970 S2 65/2400
History
This
swap was performed in 1985 when the original French SEV Motorola alternator
died. I wanted to source a US
alternator and solid state regulator for ease of future rebuild and/or
replacement as well as get extra capacity.
The
Alternator
I
went to a local rebuilder here in the Washington, DC area in 1985 and
essentially said "who put Motorola alternators in their cars?" so I
did not look it up by application, but they told me it was for a 1971 AMC
Javelin. At least that's the wiring
diagram I photocopied. I have
checked various web parts stores and they all have a listing for that car with a
Motorola alternator of 55 amps. A
recent search of partsamerica.com shows current listings for the 1971 Javelin
application with a 55 amp Motorola unit with a part designation of 7429.
Some of the 7429 units listed show up as Delco units while the others are
Motorola.
The
Voltage Regulator
The
regulator I have is by Guaranteed Parts Company of Seneca Falls, NY.
P/N VR291. They are now GP
Sorensen, a subsidiary of Standard Parts Co. and the part number is the same and
is also listed for the Javelin application on partsamerica.com.
I'm sure you could cross reference the number at any quality parts store.
The
Connections
The
regulator has four leads into a connector: Orange, Green, Black and Yellow.
Black and Green go to the field terminals. Orange goes to a tap off the diode bridge used to sense
voltage. Yellow goes to switched
voltage. That's it.
If you need a wiring diagram, find one in a Motor's manual or similar or
contact me and I can try to help.
Mounting
Here is where having an American Motorola alternator is useful. They have essentially the same case except for the tension adjustment bolt mounting hole. You need to perform a little surgery and a little creative fabrication. Remove the stamped sheet metal bracket from the back of your original alternator (the one that makes up the back half of the mounting through which passes the main mounting bolt to the cast bracket on the head) and install it on the new alternator. You may or may not have to use the long case assembly screws from the old alternator (I just don't remember) to accommodate the extra thickness of the stamped sheet metal bracket. There are two ways to accommodate the different mounting point for the adjuster arm. The first way I did it was not the easiest way overall, but was easiest for me when I had a sheet metal shop at my disposal: I made a simple sheet metal bracket (I used 16 gauge steel) that completes a half circle along the top of the alternator between the main mounting bolt and the tapped adjuster bolt hole. Drill a hole in the bracket at a point which allows you to attach to and use the stock adjuster bracket to set belt tension. The first two of the attached pictures show the front and rear of this installation. Also attached is a dimensioned drawing of the adapter bracket.
Since
then I have discovered an easier way: buy a new adjuster arm!
I found a “universal alternator/generator adjuster arm” in both the
Summit Racing and Jegs catalogs (Jegs was a little cheaper).
Jegs part number 778-66115 was $9.99, now $7.99.
This arm has to be slightly modified by cutting off the first mounting
hole (of two) on one end and replacing the existing adjuster arm;
a much simpler, cleaner and sounder installation.
It’s also chrome and looks better.
The third picture shows the newer installation. The fourth picture shows
the adjuster arm itself.
It is installed on
an 807-13 crossflow motor, but all mountings are identical to, and will work
with, the stock engine (I had mounted the original alternator when I did the
engine swap).
Your
mileage may vary!
Good
luck, I hope this helps. If you
have any other questions let me know. Let
me know of any problems or improvements to the scheme at s2europa@cox.net.
Regards,
Guy Arnos
1970
S2
65/2400
Alternator
Front
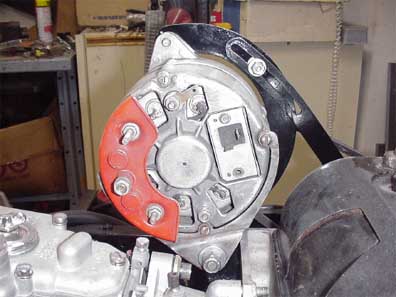
Alternator Rear (note stamped metal bracket)
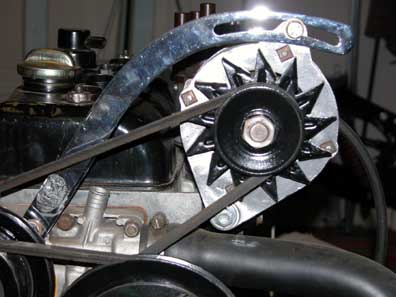
Alternator Front with New Universal Adjuster
Arm
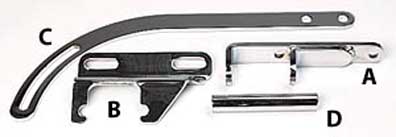
Universal
Adjuster Arm (Part C)